
The contact form is one of the most important tools for any website. It helps to establish a connection with your visitor, get feedback and sales leads, and to keep in touch with your customers. It is also an important tool for any SEO campaign because it can help you build credibility.
Today, there are many WordPress plugins for form builders available on the market. JetFormBuilder offers one of the easiest ways to create a contact form in WordPress without touching any code at all using the Gutenberg Editor. The plugin creates a custom form that you can easily edit according to your needs.
In this tutorial, we will use the Noor theme and you can see the result on our Contact Page.
Why JetFormBuilder?
JetFormBuilder is a WordPress plugin that can give you all that you need to create any form starting from the contact pages to registration forms, subscription, appointment, and booking. It also has an easy-to-use drag and drop interface which makes it possible for anyone to build their form with no coding skills at all.
Moreover, It comes with pre-built forms and integrations with popular plugins like MailChimp, MailPoet, ConvertKit, and HubSpot which make it easy for you to send your leads directly into your marketing automation platform of choice.
Here are more features with more detail:
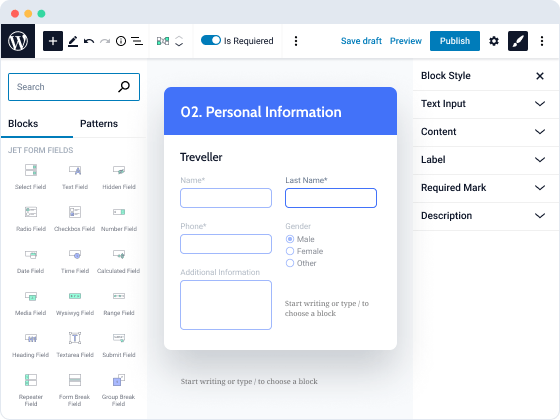
19 Form Field Blocks
Using Guttenberg you will get all the fields below:
Select, Radio, Checkboxes, Text, Textarea, Hidden, Calculated, Number, Date, DateTime, Time, Media, WYSIWYG, Range, Heading, Repeater, Group break, Form break, Submit, and Advanced Color Picker.
Smart Features:
Jetformbuilder will let you create smart online forms that react to User choices and personalize the form experience using Conditional Fields which means you can show, hide, enable, disable, or make Fields required/optional.

Calculated Content & Hidden Fields:
With these features, you can build calculator forms that perform basic and complex calculations.

Multi-Step Forms:
Multi-Step gives you the ability to break the form fields into logical steps to make them easy to digest and save the webpage space.

- Repeater Form Field
- Form Fields
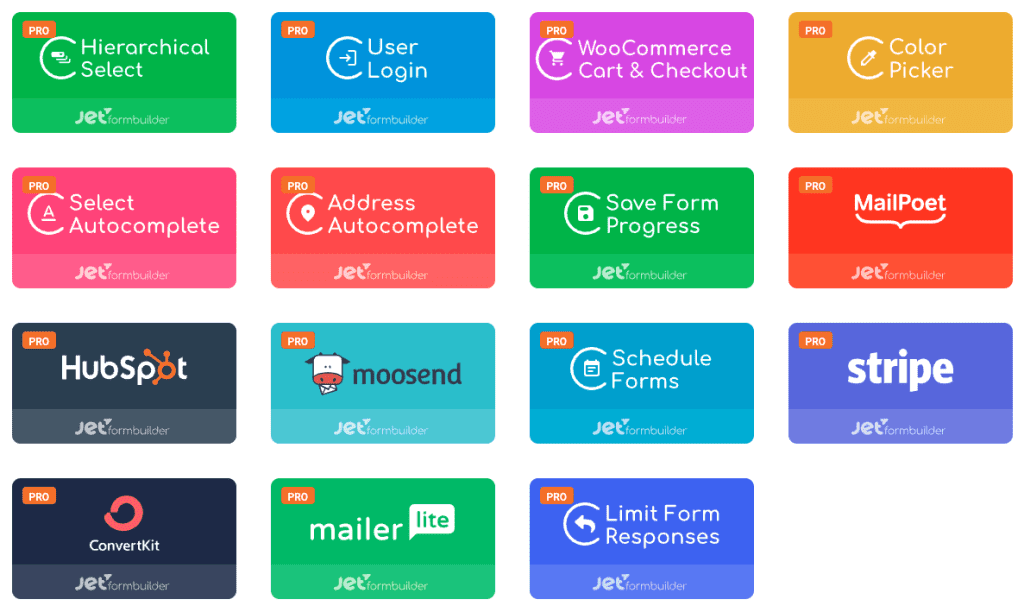
JetFormBuilder PRO Addons:
As I said before JetFormBuilder comes with the free version and the Pro version with 16 Addons.
Install JetFormBuilder:
JetFormBuilder plugin is completely free, and you can easily download and install it on your website. First thing you need to visit the Plugins » Add New page inside your WordPress admin area.
Find the plugin by typing the plugin name, after that, click install and active the plugin.
here is a detailed tutorial that will help you go through the installation process, by the Jetformbuilder team.
How to Create a Form?
1- Add a new form
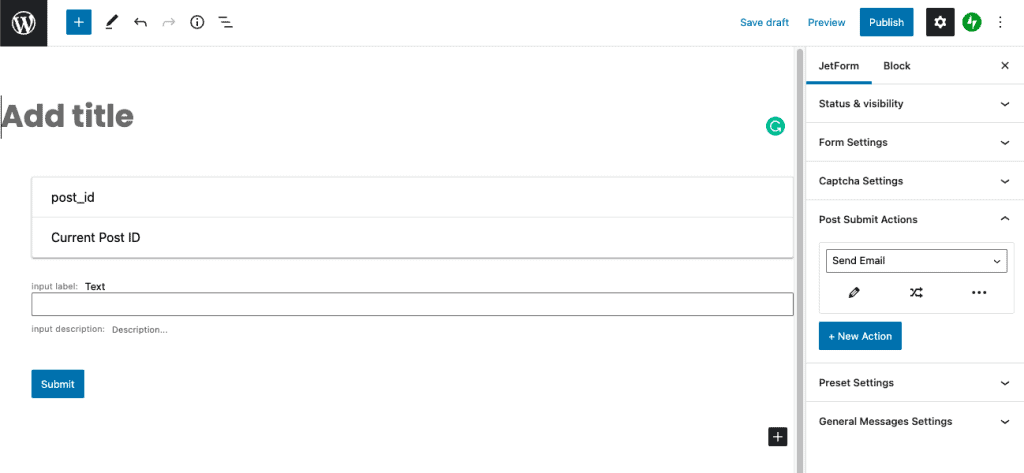
Go to your WordPress dashboard and go to JetFormBuilder > Add New.
It will open the Gutenberg page editing window. There is a text area to enter that form’s title and three fields: the Hidden field with post ID, text field, and the “Submit” button field will be added by default.
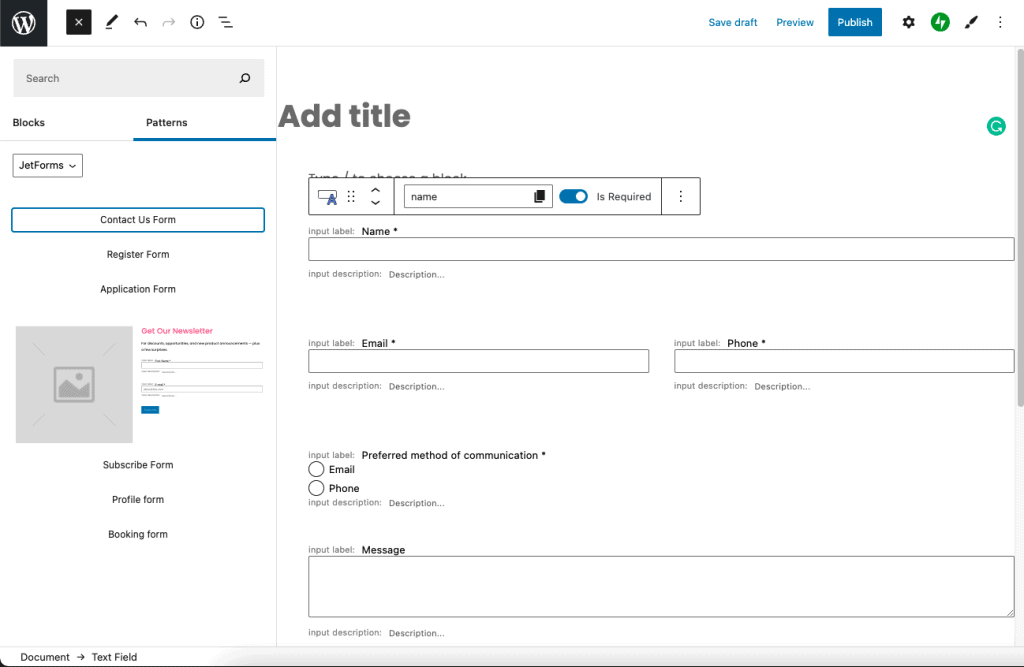
2- Add the Contact form fields
You can add your form from scratch or by adding JetForm patterns I’ll explain how to do this step by step.
– First, remove the default field.
– Click the “Add block” button with a plus-shaped icon in the left upper corner of the window and click patterns in the right upper corner below the search input.
– Select JetForm in the secluded input.
– Choose the form you want to use, for me I added the “Contact Us Form”.
3- Deal with the Form Settings
When you create a form you will have settings for each block and settings for the whole form.
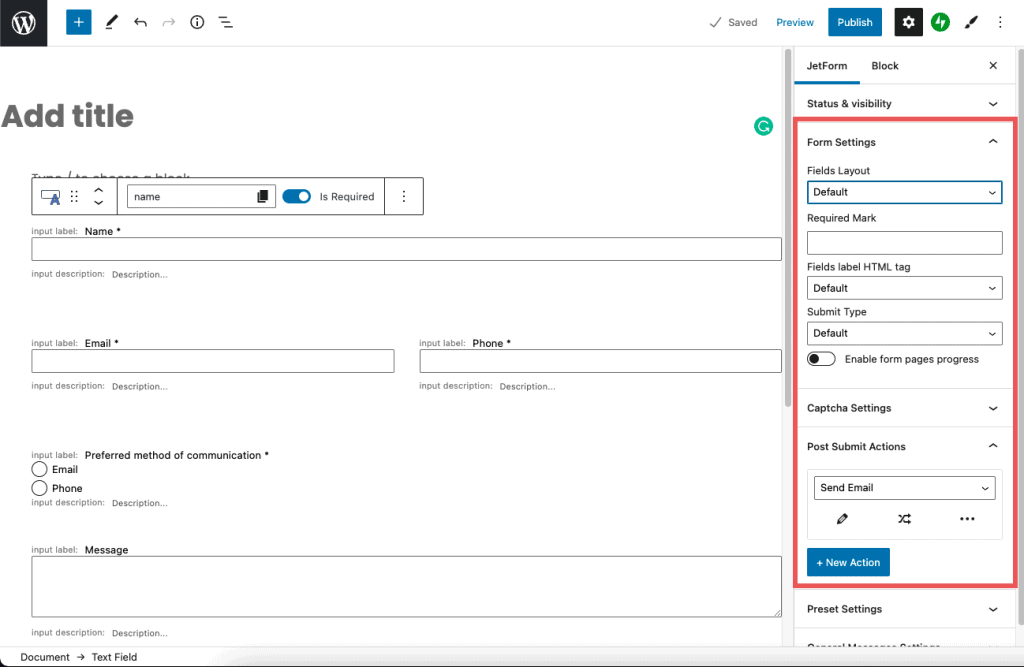
- Fields Layout. Here you can choose the position of the label. If you select the Column option, the label will be placed over the field and if you choose the Row option – it will be positioned in the same row with the field;
- Required Mark. You can choose the symbol that will be placed near the label if the field is matched as “required”;
- Submit Type. In this drop-down menu, you can choose how the page will react to the form submission. Page Reload means that the page will be reloaded when the user hits the “Submit” button, while the AJAX option doesn’t reload the page.
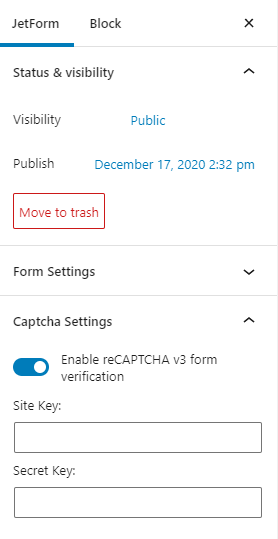
4- Add Captcha Settings
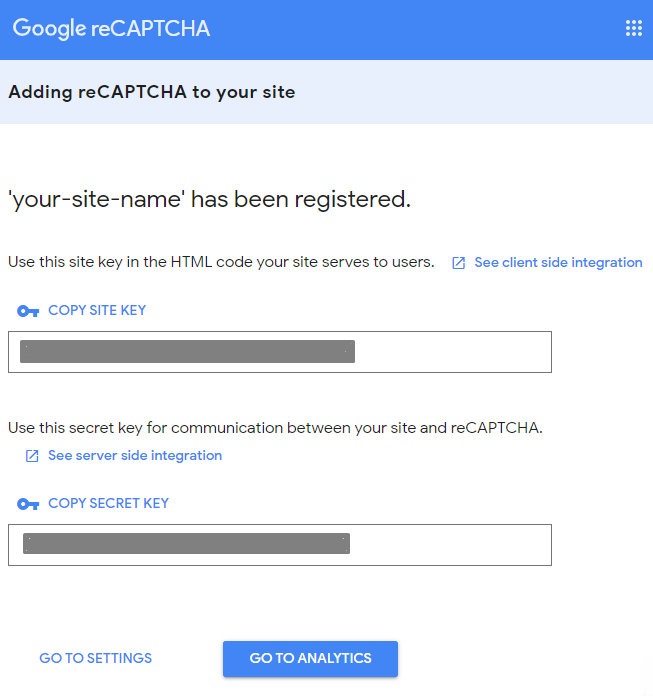
To put a captcha on your form, unfold the Captcha Settings section and enable the Enable reCAPTCHA v3 form verification toggle. Enter Site Key & Secret Key details to continue.
If you don’t have a Site Key and a Secret Key for your domain, make sure you follow the link. Enter your site’s name in the Label field, pick reCAPTCHA v3 in the reCAPTCHA type field, and type your domain name into the Domains text area.
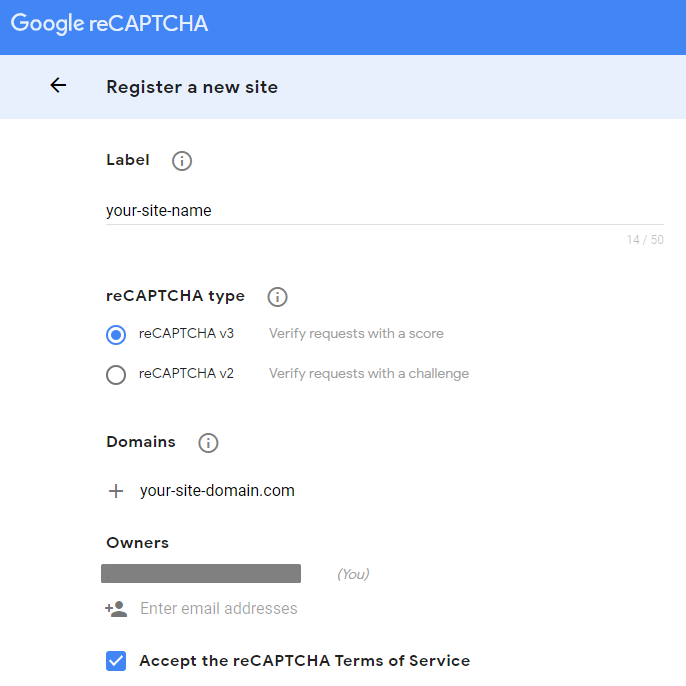
Once you click “submit,” you’ll be redirected to a page with the keys. Copy the keys into the corresponding fields of Captcha Settings.
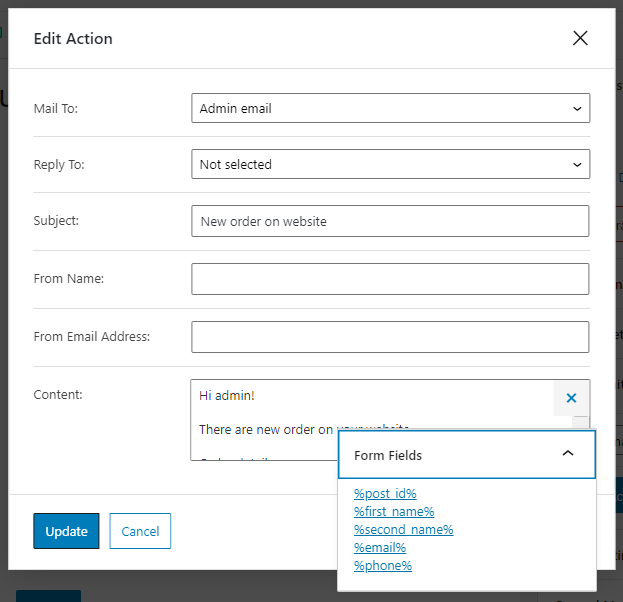
5- Set Post Submit Actions ( Send Email )
When the user hits the “Submit” button, this action sends an email to some address you choose in the settings. To do the customization, click the “Edit Action” button with a pencil-shaped icon on it. This will open a settings window.
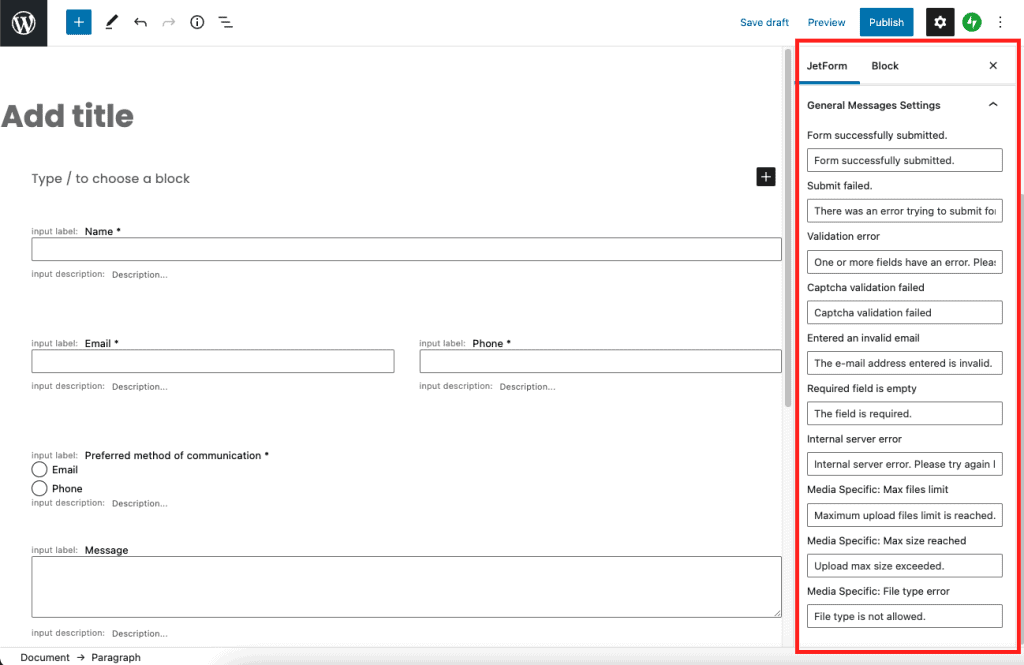
6- Go through the general messages settings
The last section allows you to set the messages that the user will see in different situations. You can type in any message that you think will be understandable to the user.
Conclusion
I hope you have enjoyed this tutorial and learned how to create a non-spam form using the JetFormBuilder plugin and Gutenberg Editor. In conclusion, JetFormBuilder is a great way to create your contact forms, surveys, or bookings. They can be used in any niche and for any purpose.
Sources:
Crocoblock : JetFormBuilder: How to Create a Form?
Jetformbuilder : Jetformbuilder Documntation